Total Pageviews

Sunday, March 31, 2013

I Choose Happy

Another recipe for mixed media fun...


“I choose happy” Mixed Media Piece:

·        8 x 10 canvas

·        Old book pages

·        ADORNit “Wildflower” scrapbook paper

·        G45 “French Country”  

·        Mod Podge

·        TCW 12 x 12  stencils (Cosmic Swirl)

·        Dylusions Ink Sprays (London blue; White Linen)

·        Dylusions “Dy’s Alphabet” stamp set

·        Distress Stain and Ink Pad in Forest Moss

·        Art Anthology Sorbet Gel Paints (Splashed, Vegas Gold  )

·        Art Anthology Dimensional Crystals ()

·        Liquid Pearls (Avocado, Buttercup, Baby blue)

·        Prima Wood Embellishments

·        Black Sharpee


Friday, March 29, 2013

Bursts of Birthday Joy

This is the last of the four embossing folders by Couture Creations.  I can't wait to see the releases next month.  Each moth they come out with new folders that are only available until they are gone!


Wednesday, March 27, 2013

Embossed Vellum

Another beautiful embossing folder by Courture Creations.  I just love the way vellum embosses!  I attached it to the cardstock with Tim Holtz's Tiny Attacher. 


Tuesday, March 26, 2013

29 Again??

Another store sample that features Couture Creations Embossing folders.  This time is used Tim Holtz Core paper and some Prismacolor pencils.


Saturday, March 23, 2013

ADORNit Card

Here is a sample that I made for the Hen House...featuring ADORNit Paper..  notice the shimmer on the upper two circles?  You get that effect when you cover any paper with Art Anthology Gel Sorbet paints.


Tuesday, March 19, 2013

Dance Like No One is Watching

This is my second mixed media piece.  My daughter wants to become a dancer so I was thinking of her while I made this.

I just love text on top of text!


Can you tell that his dance stick is a coffee stir stick?


“DANCE like no one is watching” Mixed Media Piece Supplies (Most of the supplies can be bought at the Hen House Paperie):

·        8 x 10 canvas

·        Old book pages

·        Mod Podge

·        TCW 6 x6 stencils (Flower Frenzie; Circle Explosion)

·        TCW 12 x 12 stencil (Nancy, Emily, Polly)

·        Dylusions Ink Sprays (Bubblegum Pink; Lemon Zest; Squeezed Orange; Cut grass; Fresh Lime )

·        Black Sharpee

·        Adirondak “Black” Acrylic Paint Dabber

·        Art Anthology Sorbet Gel Paints (Splashed; June bud)

·        Stickles (Firefly)

·        COPICS to color the heart brad (any red) and gem stones (any bright green)

·        Large alphabet stamps

·        Black Archival Ink pad

Sunday, March 17, 2013

Couture Creations

Here is a sample I made featuring Couture Creations Limited Edition embossing folder and Art Anthology Sorbet Gel paint.


It Takes A Village

I have been wanting to dabble in mixed media art and have finally taken the plunge.  Here is my first piece.  I am a bit in love with using old book pages for the background and I love Dylusion Ink Sprays with TCW stencils.


The houses are stamped on sticky back canvas, embossed in white and then colored with Distress stains.  I added Art Anthology Dimensional Crystal for the windows and Liquid  Pearls for other detail.


The sun was made with Art Anthology Sorbet Gel paint and Dimensional Crystals and Stickles.

“It Takes A Village” Mixed Media Piece Supplies:

·        8 x 10 canvas

·        Old book pages

·        Mod Podge

·        TCW 6 x6 stencils (Aspen Trees; Flower Quarter)

·        Dylusions Ink Sprays (London blue; Cut grass; Vibrant Turquoise; Fresh Lime; White Linen)

·        Piece of clear acetate

·        Memory Box little clouds die cut

·        Dylusions “Right Up Your Street” stamp set

·        Sticky Back Canvas

·        Emboss It embossing ink pad

·        Clear embossing powder

·        Distress Stain in blues and greens

·        Art Anthology Sorbet Gel Paints (Baby blue eyes; Vegas gold; Chocolate)

·        Art Anthology Dimensional Crystals (Java, Sunbeam, White_

·        Stickles (turquoise, orange peel, Lavender)

·        Liquid Pearls (Ivy green, dark chocolate, white opal)

·        Black Sharpee

·        MME Enamel Dots

·        Adirondak “Black” Acrylic Paint Dabber

Friday, March 8, 2013

Window Strip Card


·       Cardstock: craft (4 ¼ x 11; 4 ¼ x 2 1/2 ; 4 ¼ x 2); Green 4 ¼ x 3); brown and tan scraps

·       Speciality Paper: Basic Grey serenade “50 pence” (4 x 2 ¼) and “bustle” (4 x 5 1/4 )paper ; Judakins Embossable Window Plastic (4 ¼ x 5 ½ )

·       Stamps: Thanks stamp (maker unknown)

·       Ink: Archival “coffee” ink; Distress “Vintage photo”

·       Embellishments: tan twine

·       Tools: Memory Box Poppy “Lorelai leaf” die; die cut machine; ek tools layer punch “flourish square”; We are Memory Keepers Corner Rounder

·       Pens: Brown Sharpee

·       Adhensive: Thin 3D Foam Squares; Glue stick

1.     Cut your card base front at 3 inches.  Set the card aside.  Take the piece you cut off the front and cut 1 inch off.  This will leave you with a piece that is 2 x 4 1/4”. 

2.     Adhere your acetate to the back of the card front.  Make sure it is lined up completely with the inside edge and top and bottom of the card front.  Now take the extra piece that you cut from the card front (minus the one inch) and adhere to the front of the acetate that is on the left of the card front.  This will give you a window.

3.     Adhere the other craft pieces to the inside of the card front to cover the adhesive that is holding the acetate to the card. Corner round the top right corner of the card front.

4.     Corner round the right corner of the card inside. Adhere the right corner of the green piece of specialty paper. Adhere the green piece of specialty paper to the inside of the card.

5.     Sponge the edges of the newsprint piece of specialty paper with the Distress Ink.  Adhere to the left front panel of the card front.

6.     Cut the leaf die from the green piece of card stock using the die cut machine.

7.     Carefully color the branches brown using the Sharpee.  Use the glue stick to adhere to the front of the card as shown.

8.     Use the layer punch on the middle setting and punch a brown border using the brown cardstock scraps.  Tie a piece of twine on one end and adhere to card bottom right front.

9.      Use the layer punch on the middle setting and punch a tan center (using tan scraps).  Sponge the edges with the Distress ink and then stamp the sentiment using the “coffee” Archival ink.  Adhere using a foam dot.

Saturday, March 2, 2013

Fun. Dina Wakely Style

I was inspired by Dina Wakely at CHA to make the following two cards.

I took a page out of an old book that I bought from a garage sale. Next I used TCW stencils and Dylusion sprays to create colorful patterns. This method always leaves a bunch of colorful wonderfulness on the stencil. So a took the wet stencil and wiped it on another page from the book. Next I used the new silhouette stencils by Dylusion and painted around the stencil with a black paint dabber. I covered the whole thing with Art Anthology "Linen" Sorbet Gel Paint ... love the shimmer. Then I drew around the silhouette with some white Art Anthology Dimensional Crystal in white. I didn't like it so I smeared it around the image. I mounted it on the black shiny paper from the Dylusion stencil package and put the whole thing on a green card.

I made the second card with the scratch page that i cleaned my stencils and brushes with. I added an image from the new Dylusion Couture stamps which I colored by blending three Distress Inks on a piece of white paper and then cut out to adhere to the front of the card. I added some MME embellies and called it a night.


Friday, March 1, 2013

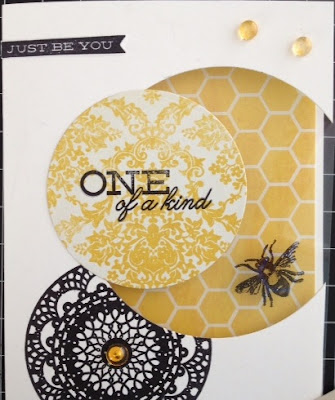
Circle Window Card


·       Cardstock: white (5 ½ x 8 1/2)

·       Speciality Paper: MME the sweetest thing Paper Honey “perfect”(4 x 5 1/4) and Honey “simply lovely” (3 x 3) ; Judakins Embossable Window Plastic (5 ½  x 4 ¼ )

·       Stamps: MME the sweetest thing Honey “Happiness” stamp set

·       Ink: Archival Black ink;

·       Embellishments: Dew Drops

·       Tools: Circle dies; die cut machine

·       Adhensive: Mini Glue Dots; Ultra Thin 3/8” Glue Dots


1.     Adhere honey comb paper to the inside of the card.

2.     Stamp the large lace circle in black on the front of the card (near the bottom left). 

3.     With the card open place the large circle die on the right front of the card. (Make sure that a bit is off the right edge and that you will be cutting off some of the black lace circle).  Run through the die cut machine.

4.     Use four large glue dots to adhere the window sheet to the inside of the card front.

5.     Cut a circle out of the 3 x 3 yellow patterned paper. Stamp the sentiment in the middle of this yellow circle.  Use the two glue dots to adhere as shown.

6.     Stamp one bee on the front of the acetate window and then stamp another on the back to cover the glue dot holding the yellow circle.

7.     Stamp the banner at the top left of the card.

8.     Attach 3 dew drops with mini glue dots.