Total Pageviews

Sunday, February 27, 2011

Janea rocks!

Janea is my friend and my up-line in Stampin Up. Yesterday at our monthly swap club she had two make and takes that were just fabulous! The first used the new "Framed Tulips" embossing folder and the "Bold Blossom" stamp set. Both are featured in the Occasions Mini Catalog.

The second one was oh-so-clever. First of all, it folds flat to a standard A2 card size:


The coolest thing is that it opens to be a 3-D freestanding card:
Super cute!!!!
Posted by Picasa

Clever Lantern Card


I wanted to share a beautiful card that my friend Donna made. Isn't it just gorgeous! And what a clever and simple way to make a paper lantern for a card! Donna used this card at our monthly Card Swap club yesterday. I will be posting the projects that we did later on today or tomorrow. Off to my daughter's volleyball tournament!
Posted by Picasa

Friday, February 25, 2011

Pocket envelope gift card


Thought I'd share a couple of gift cards that I made. The background is just a solid piece of decorative cardstock. The little Asian dolls are stamped on a cream envelope that is folded in half. Then you cut the sealed flap off the right side and lick and seal the left side. This creates a great little pocket. See diagram below for cutting diagram:


I stamped my image on the front and colored with pencils. Then adhered the pocket envelope to the center of the card. I used a brad and a metal tab that swings to hold the pocket envelope closed.    Here is a photo of one of the cards with the pocket envelope opened.  I added a greeting on a scrap of coordinating paper.

Thursday, February 24, 2011

Email subscription

Sorry it has been a while since I posted but I have been battling a migraine.

I have gotten a few requests to provide the abilty to get email updates when I add new posts to my blog. I had a link that worked for some but you had to use specific email servers (e.g., yahoo). So I found a new tool that I added on the left side of the screen under the "email me" button. If you wish, give it a try and let me know if it works for you.

Hoping to post a card tomorrow.

Sleep well everyone and let's hope that tomorrow I will be migraine free.

Saturday, February 19, 2011

Yippee for DSP!

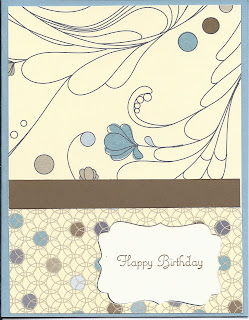
DSP is Designer Series Paper by Stampin Up and I just love it. The paper coordinates so well together and in the catalog they list the solid SU colors that work well with the DSP. So it is really easy to create a well coordinated card. For this card, I used the Elegant Soiree DSP.

I punched out the decorative label on the bottom right hand corner to make a window.


On the inside of the card, I punched out "Happy Birthday" using the Decorative label punch. I framed it with a technique I saw on Mary Fish's blog. Click on the link to see the blog and the video.

Posted by Picasa

Thursday, February 17, 2011

Fun With Acetate Class Coming Soon!

There are only two spots left for my fun with Acetate class that will take place on March 5th at 1pm. Email me if you want to attend or want me to send you a kit.

These are the four cards we will be making.  

1.  Acetate and silver leafing
2.  Embossed acetate.

 
3.  Acetate window

4.  Acetate pocket insert

Hope you can join us!

Tuesday, February 15, 2011

Deer Friend


Take a peek at the card that I got from my dear friend Laura. Truth be told...she is the reason I started stamping. She encouraged me to join a local stamping group called the Land of Enstampment. I couldn't imagine what you could do with a simple stamp and ink pad. Boy! How naive I was! Now I know that there are endless things you can do in the world of stamping. Visit Laura's blog to see her beautiful creations.
Posted by Picasa

Monday, February 14, 2011

Happy Valentine's Day

Hope everyone had a wonderful Valentine's Day. I am spending mine with my best friend, who lucky for me, happens to be my husband.

Today, I am posting another wonderful card designed by my friend, Sandy. I believe the bugs are from an old SU set. Love the way the middle image is popped up and her choice of ribbon. She has a way with selecting just the right colors. She's been my color coach for a long time.
Posted by Picasa

Tuesday, February 8, 2011

Window message


Yippee! I finally made the last card for the "Fun with Acetate" class. I wanted to create a window that would show a message on the inside of the card. In this case, the "Happy Birthday" is stamped on a white strip that is pasted on the inside of the card. The window is between the two red strips of card stock.


To the left is the card opened. The white at the top is the window that closes on top of the "Happy Birthday". I used the "rock-n-roll" technique to stamp the butterflies on the front and inside of the card.
Posted by Picasa

Monday, February 7, 2011

What a difference a border makes...


Just thought I'd show you how a border punch can really jazz up a card. The card on the right was my original design but I felt it lacked something. I added a fancy border to the yellow paper and it really made a difference.
Posted by Picasa

Sunday, February 6, 2011

Colored Pencils and Gamsol


While my husband watches the Super Bowl, I was going through some old cards that I made. This card was created using scraps of paper that I had. The image was stamped with a black dye based ink and then colored using colored pencils and gamsol. Gamsol can be purchased in most art stores. It is used to break down the wax in the colored pencils so that you can blend them. It looks almost like watercoloring.  Here is a video that shows you the technique.

Below is a card my friend Sandy did using the gamsol technique:


Give gamsol a try.  You won't be disappointed. 

Posted by Picasa

Friday, February 4, 2011

Faux pinwheel


Here is the card my mom did for our next swap club. My friend Kim showed me Barb Mullikin's blog with easy video  instructions to follow. Basically just two 2 5/8 " squares (brown) and eight 1 1 /4 " squares (4 each in 2 different patterns). What a great way to use up scraps to make a beautiful card!
Posted by Picasa

Thursday, February 3, 2011

Calendar Pages with MDS


OMG! One more snow day due to the school busses not starting. So...I thought I would share some layouts that I created with My Digital Studio ealier this winter. My husband and I made calendars with MDS this past Christmas. Super fun and easy.  Enjoy!
Posted by Picasa

Wednesday, February 2, 2011

Punches can be oh so useful!

Thanks to Mother Nature, we are in Day 2 of Snow Days. Being snow bound, I was able to complete my swap cards for a club that I am in. I used some retired SU paper and two cool punch techniques that I found online. The chunky scallop border is actually made by using the SU Fancy Flower punch. One punched flower makes a 4 inch scalloped border. Visit Mary Fish's blog to see her One Minute to WOW video with instructions for the scallop border. The circle is made using a 3 inch square and the SU Round Tab punch twice. Visit Barb Mullikin's blog to see her easy to follow instructions for making the circle.  I just love using punches creatively!
Posted by Picasa

Tuesday, February 1, 2011

Embossed Acetate


I finally came up with a design that I liked using embossed acetate. This will be one of the cards that we make in my "Fun with Acetate" class on March 5th. My generous friend, Kim gave me a ton of acetate from different suppliers to play with and compare. And for embossing, I really felt that the SU Medium Window Sheets (p.205 in the Catalog) worked best for embossing.
Posted by Picasa